Product Features | Eve Thermo

All features of Eve Thermo

Sep 20, 2022 - by Lars - Comments


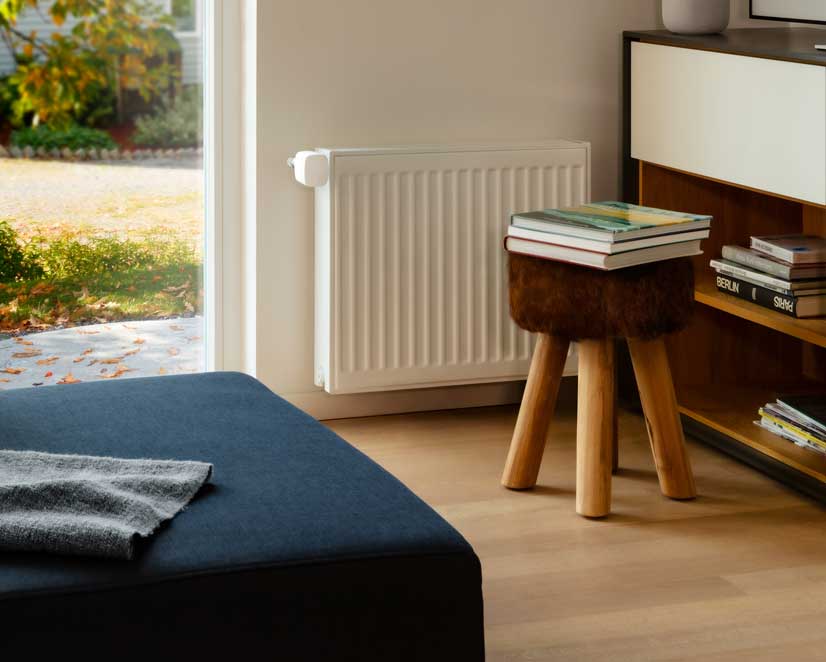
The multi award-winning Eve Thermo smart radiator valve is quick and easy to install and set up. And with a bit of fine-tuning, it can unleash all the convenience that connected heating has to offer. Read on for a detailed overview of all the functions Eve Thermo offers. 


Now supports Thread

The fourth generation of Eve Thermo, which is available since autumn 2020, now also supports Thread along with Bluetooth. Eve Thermo joins your Thread network automatically, which makes  your smart home network more responsive and robust, plus it increases its reach. 


Thread accessories don’t need a proprietary bridge to communicate with each other – they simply need a Border Router, which for HomeKit over Thread is HomePod mini or the new Apple TV 4K. Battery-operated Thread accessories, such as Eve Thermo, represent endpoints in your Thread network. Discover all you need to know about HomeKit over Thread here. 


You can add Thread support to your latest-generation Eve Thermo simply by updating the accessory’s firmware. Discover if your Eve Thermo can support Thread by visiting evehome.com/identify. Installing the firmware is simply a matter of opening the Eve app and tapping Accessories > [Eve Thermo]. 


Heating via an app, touch controls and Siri 

You can control your heating using the Eve and Home apps or simply ask Siri to make your room warmer, set it at a specific temperature or stop heating. 


Siri control 


  • for your whole home: "Hey Siri, set the temperature to 21 degrees."
  • room by room:  "Hey Siri, set the bathroom to 23 degrees."
  • within a zone: "Hey Siri, set the temperature in the first floor to 21 degrees."
  • as part of a scene: "Hey Siri, good night!" 


Plus, you also enjoy granular control of your heating in increments of 0.5°C on the smart radiator valve itself. 

Scheduled heating designed around you

Eve Thermo is built around schedules, which are a really simple and effective way to control your Eve accessories. They’re also a breeze to create using the Eve app – and once you’ve done that, they’re stored automatically on your Eve Thermo so your accessory can set about controlling your heating completely autonomously and all independently of your iPhone and an internet connection. 

Each room in your home requires a different temperature, and even that temperature should change to suit the time of day: You want it nice and warm in your bathroom early in the morning, followed by your living room a little later on as well as in the evening. Your bedroom should be set to a constant 17 degrees. Plus, you may also want to take into account that you like to doze under the duvet for that bit longer on Sundays and that the kids arrive home earlier on Thursdays. Sounds complicated, right? Well, using schedules means you’ll get everything fine-tuned to suit your routine in a flash. 


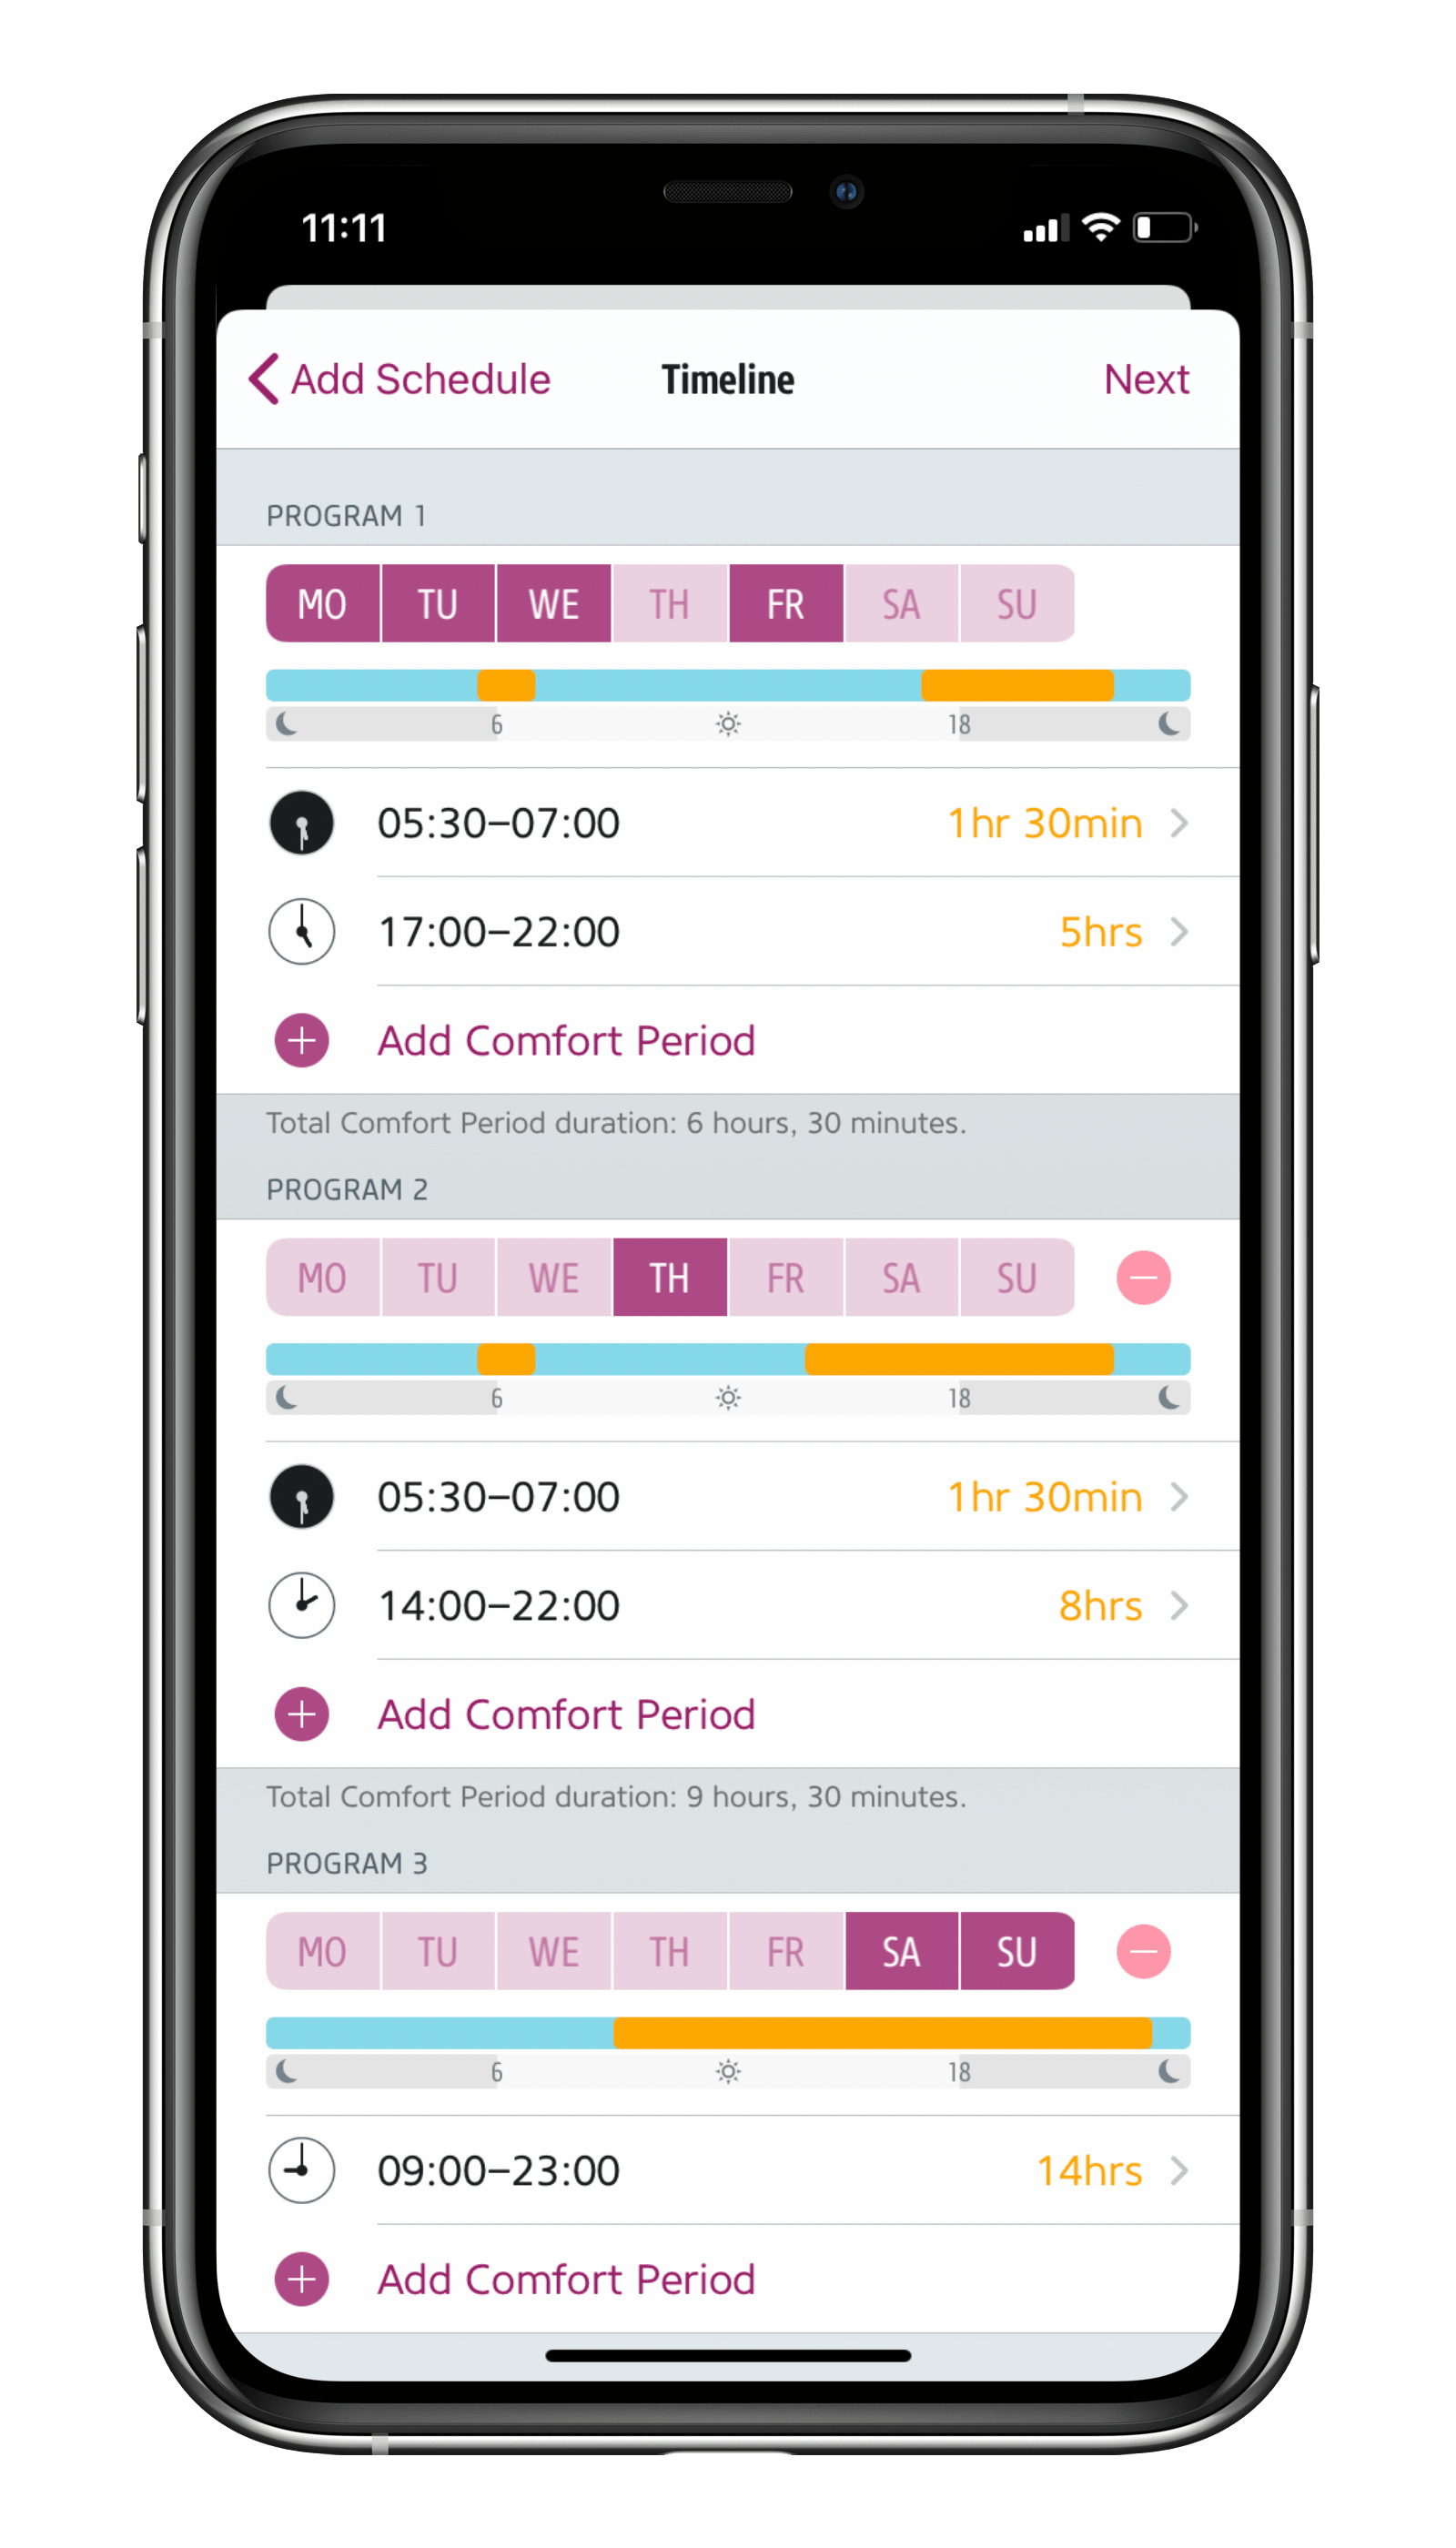
You can create a custom schedule for each room in the Eve app, plus you can set the comfort and economy temperature for the room in question. You can then configure the various schedules for workdays and the weekend, or individually for each day – or even for all days. Each schedule offers 3 heating phases such as mornings, afternoons, and evenings. 


The "Days Off Calendar" function accesses a calendar chosen by you on your iPhone (such as "Holidays") and ensures that the weekend schedule is run on days which are public holidays – all without you having to lift a single finger. 


By the way: Even if a schedule is active, you can still adjust it via the app, Siri or manually on the accessory itself. This setting is then changed with the next scheduled temperature change.

Heating depending on if you’re leaving or arriving at home

Life doesn’t always go exactly according to plan, so to cover all of life’s little eventualities you’re best off controlling your heating using a combination of schedules and location control. At all times, you remain in full control, and your privacy continues to be protected to the highest standards.


To control your heating based on location, you need a home hub (HomePod mini, HomePod or Apple TV). This enables HomeKit to determine if everyone has left home without anyone’s location constantly being tracked, recorded, or possibly even shared. Since only the technology baked into iOS is used for this function, it saves your iPhone’s battery and also ensures a profile of your movements cannot be created – not by Eve, by Apple, nor by any other unscrupulous individual who may have gotten hold of your information through a data leak. Your and your family members’ location is always determined based on the particular device set under "Find My" in the Apple ID settings.


Location-based heating is a breeze to set up for Eve Thermo in the Automation area of the Eve app. Go to Rooms, choose Eve Thermo and Automation. There you can also choose whether to suspend schedules when nobody is home. You can also set the temperature you want maintained while your home is vacant.

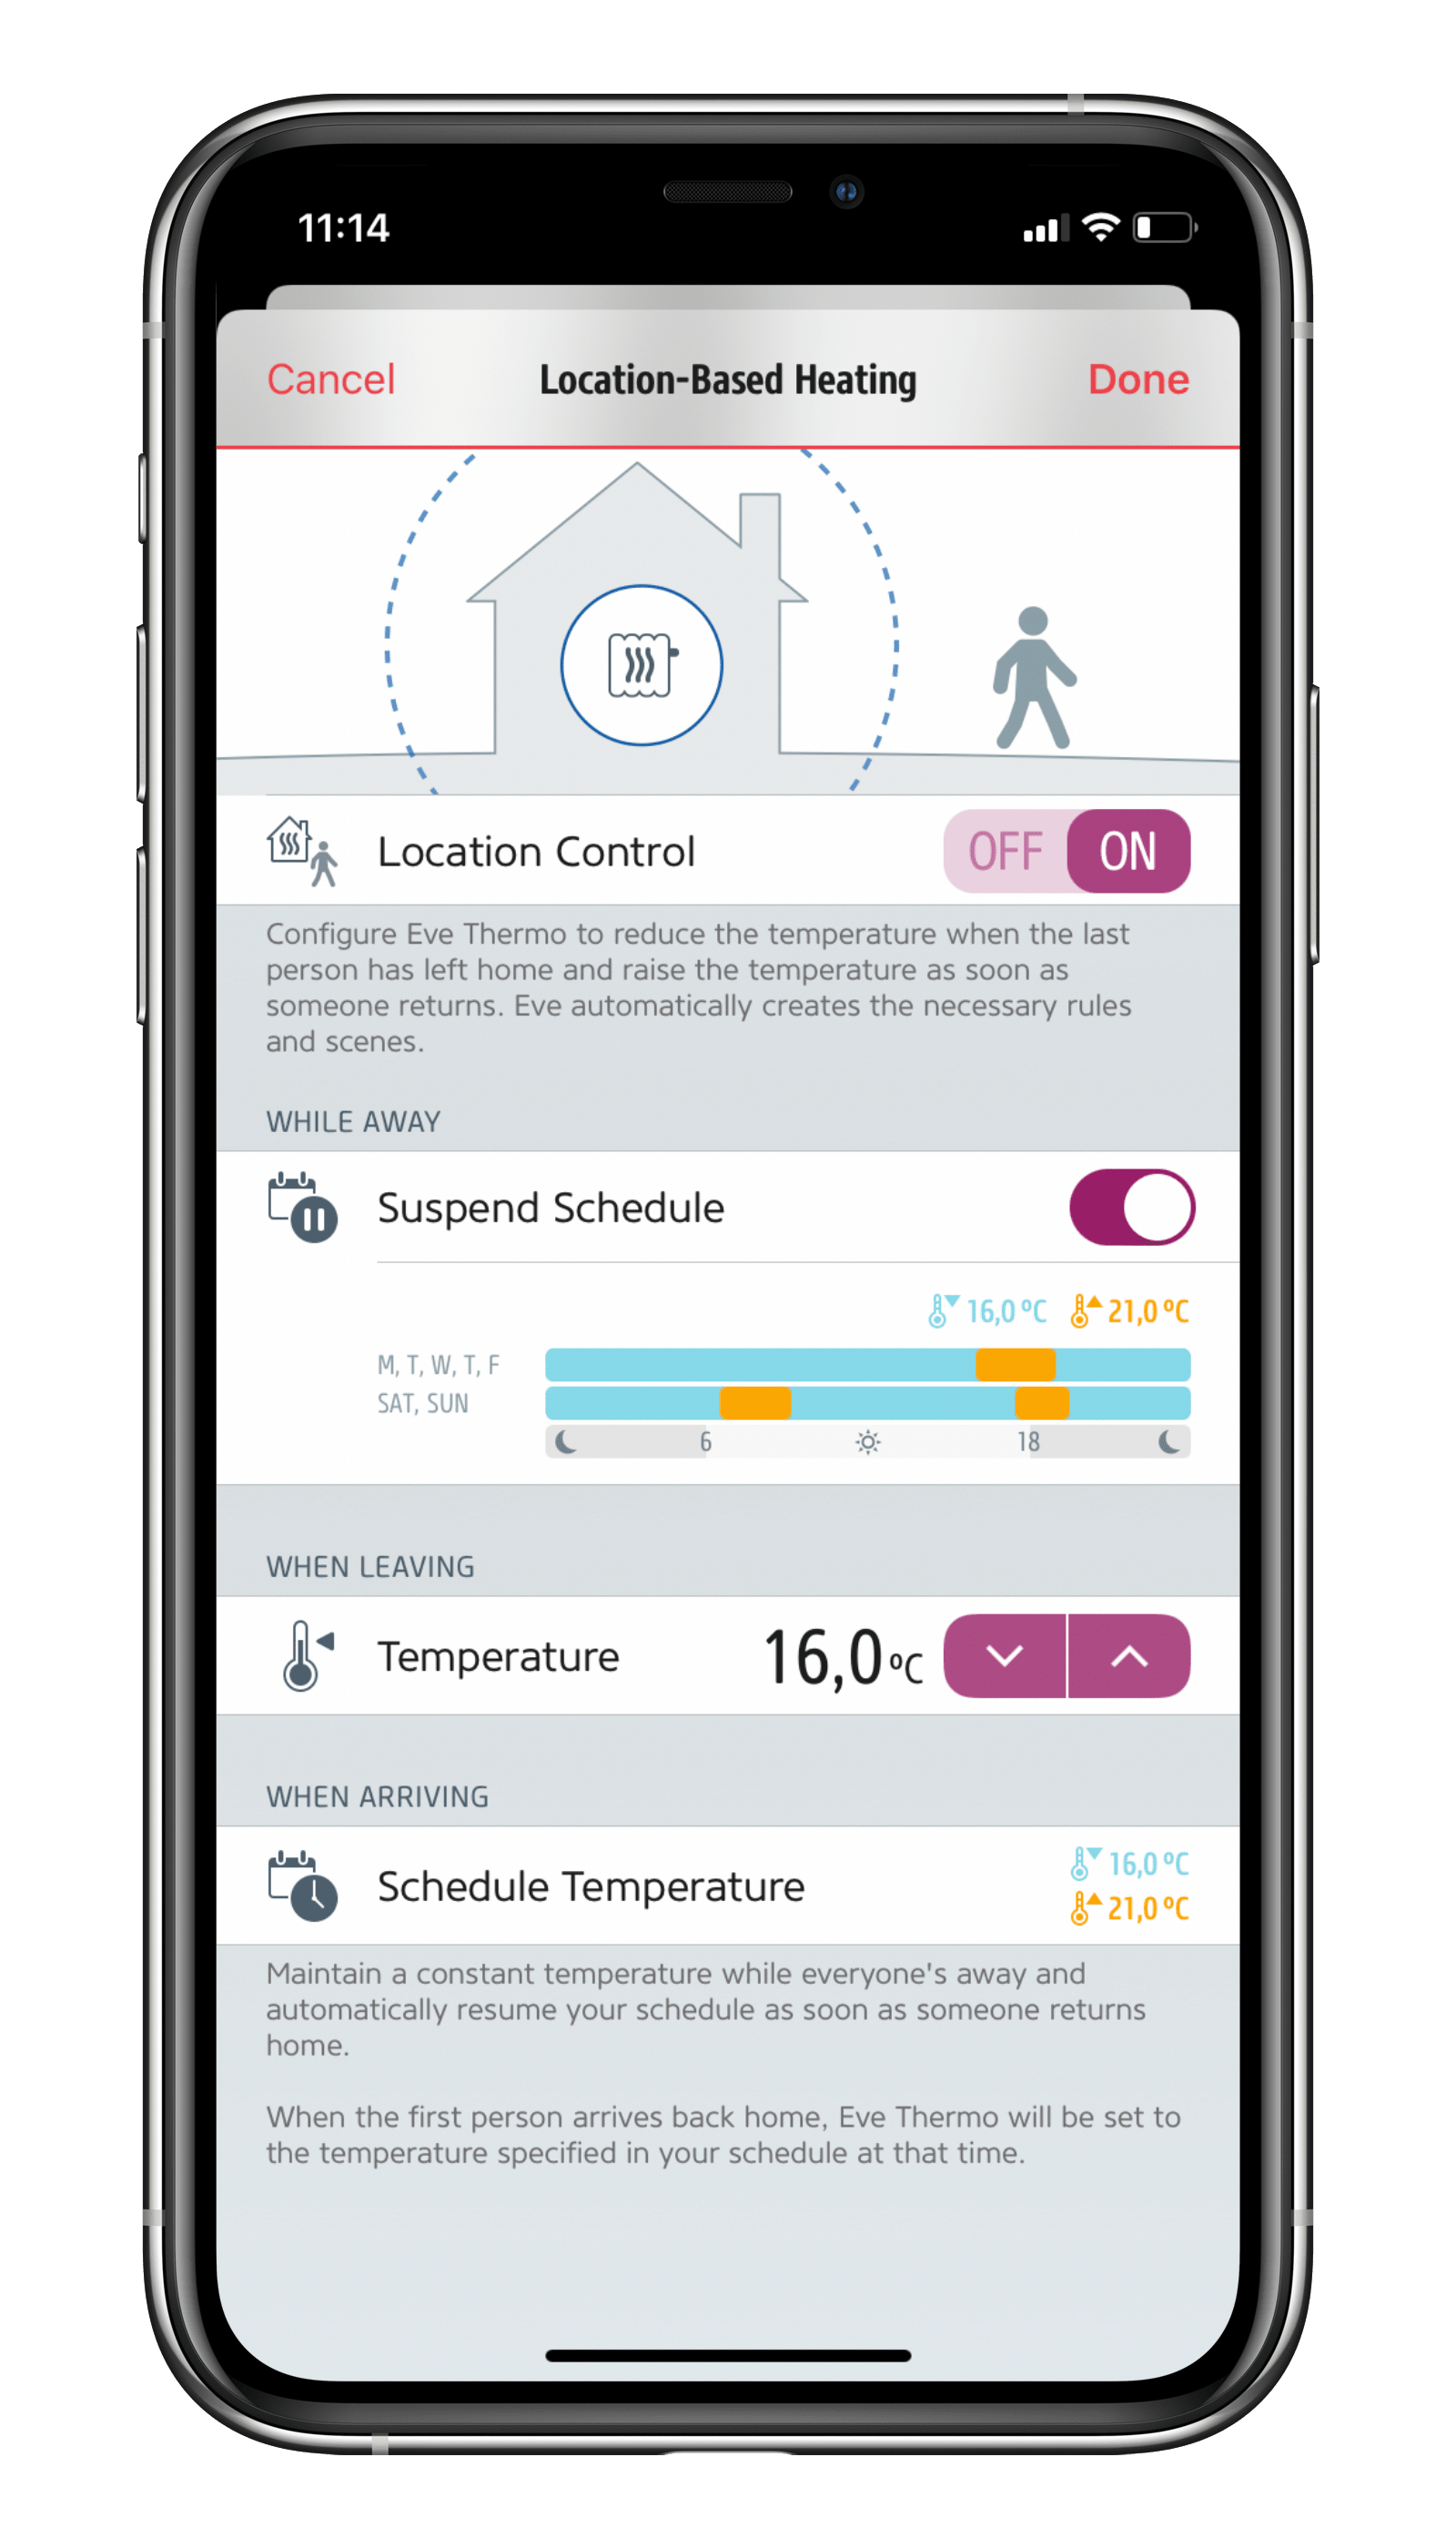
When you turn on this option, the schedule will only be resumed once the first family member arrives home – meaning that when nobody’s home, your set temperature will be maintained to prevent your home cooling down too much.

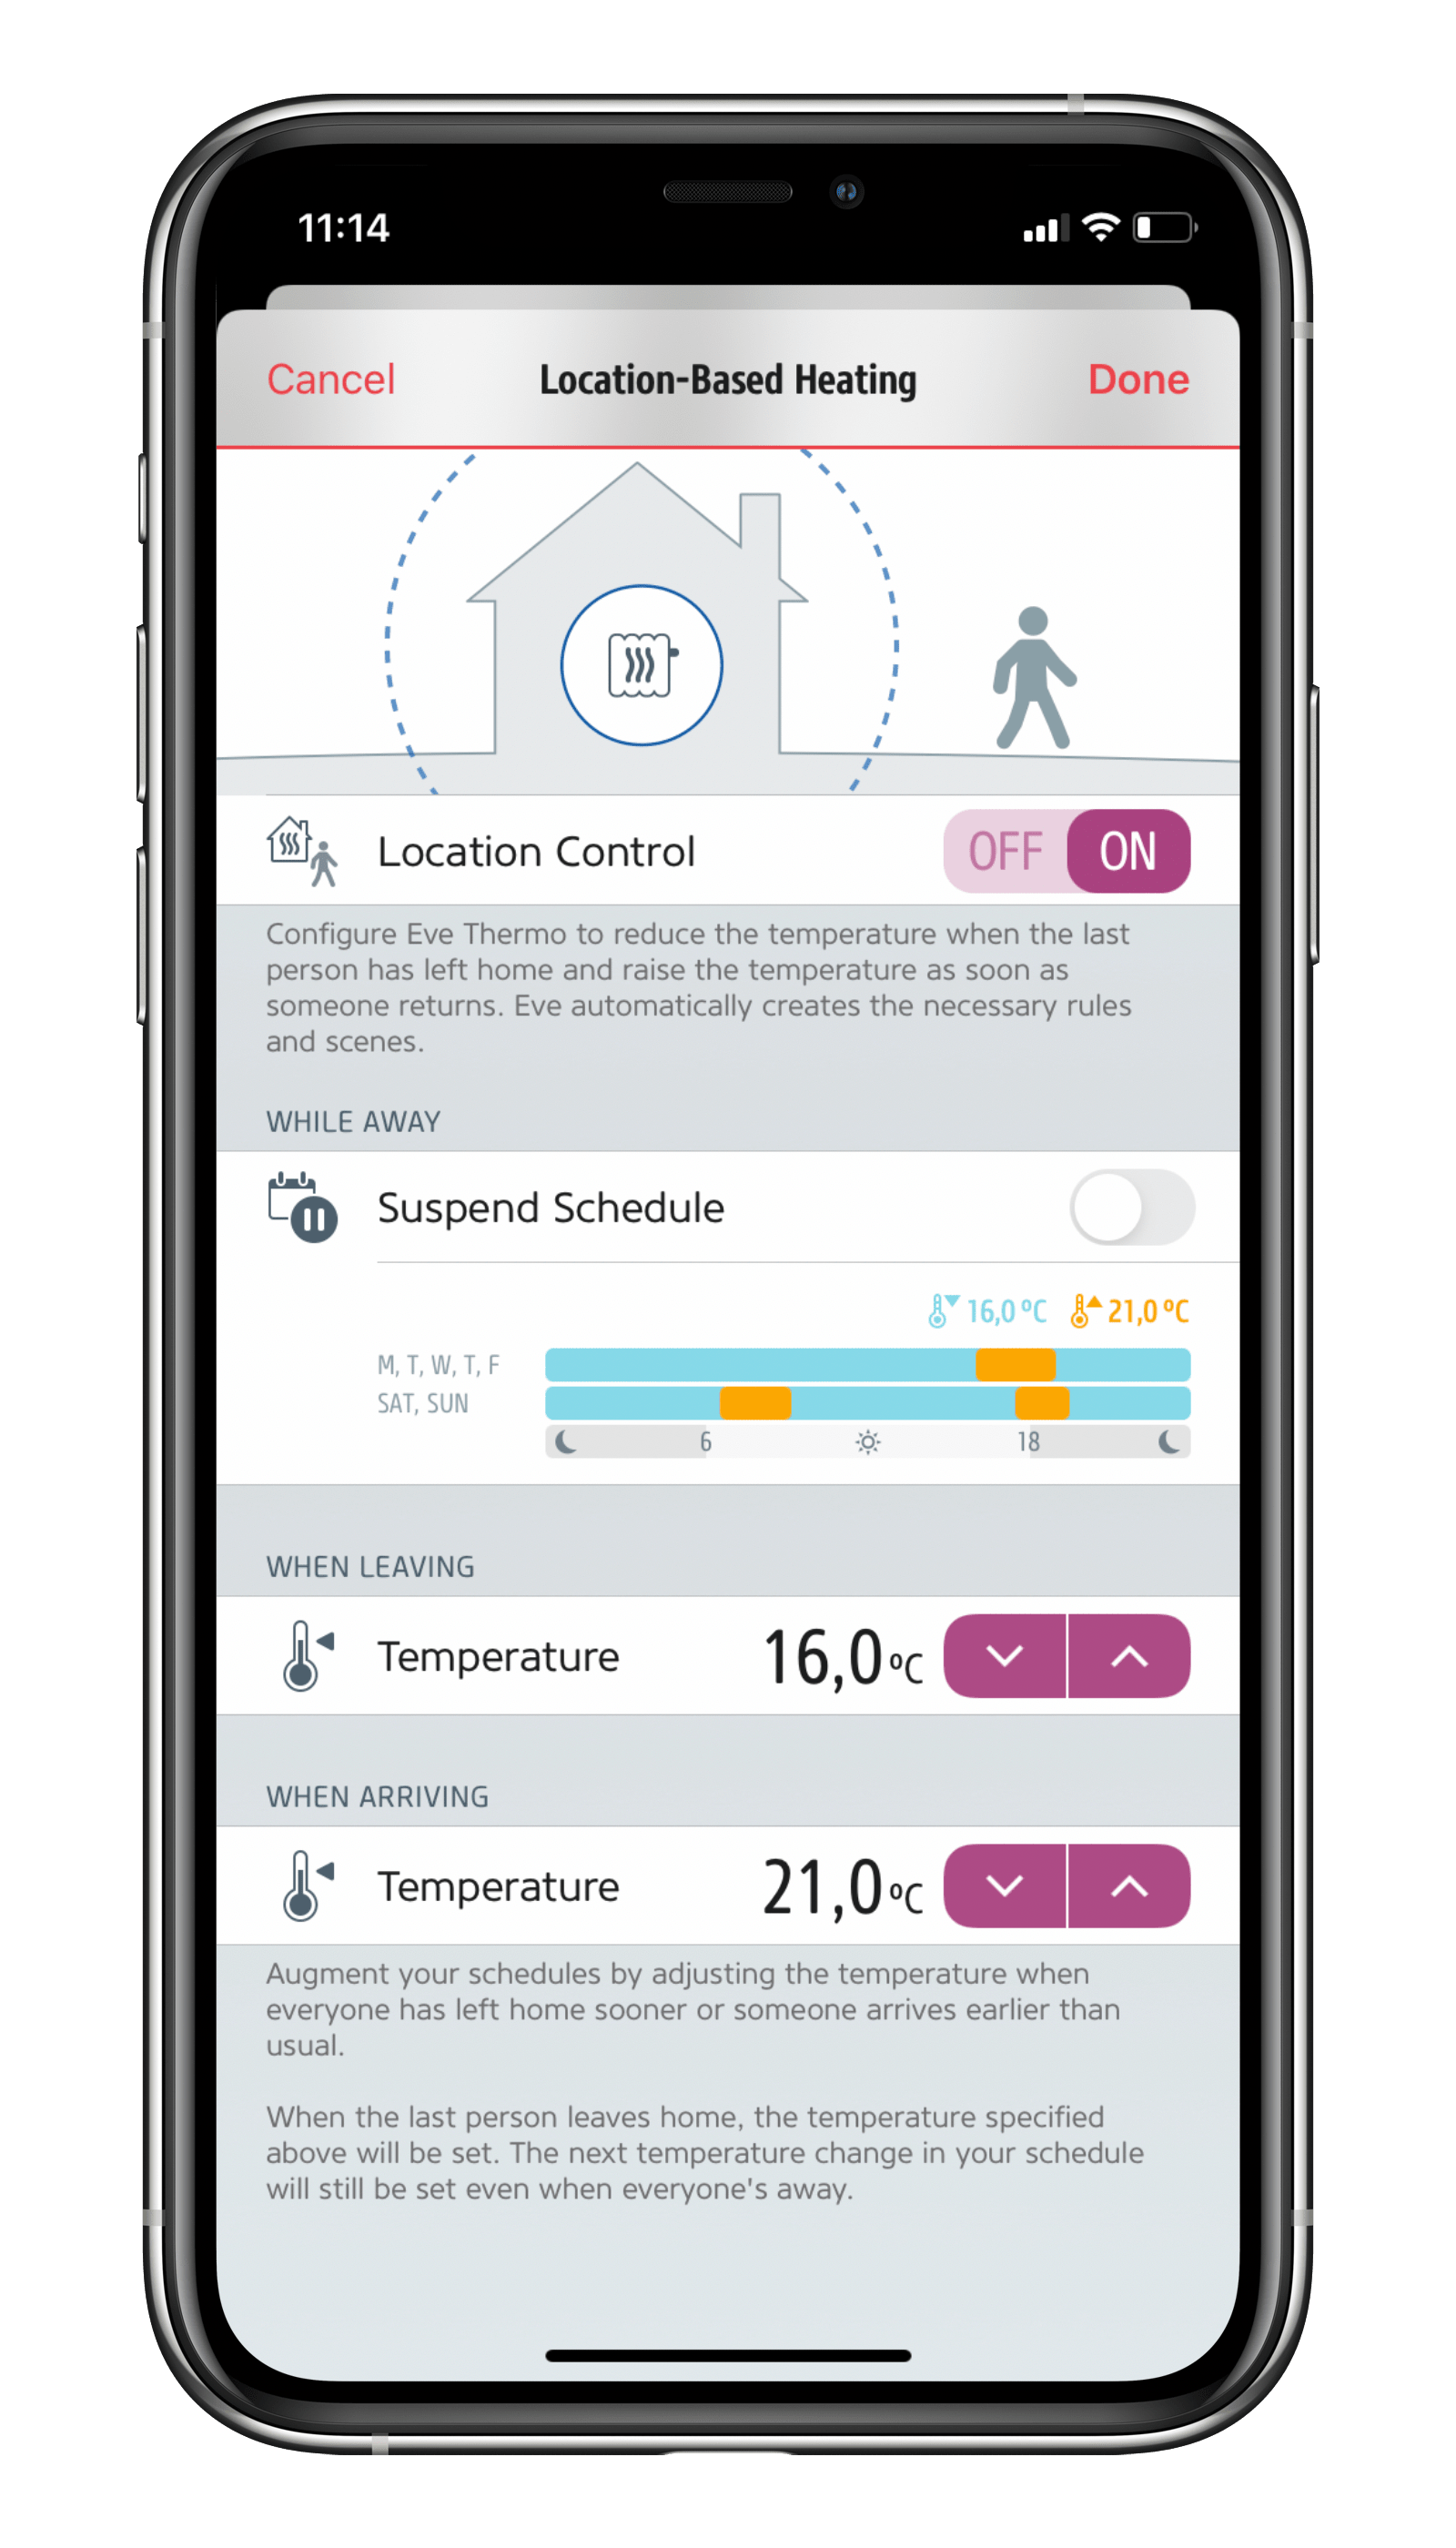
If you choose not to suspend schedules, the temperature will be lowered as soon as the last person leaves home. However, the next heating phase will still be activated even if your home is vacant. This way you can be sure that your heating will be lowered even if everyone leaves home earlier than usual, yet you will still return home to a nice warm place that’s been pre-heated for you.

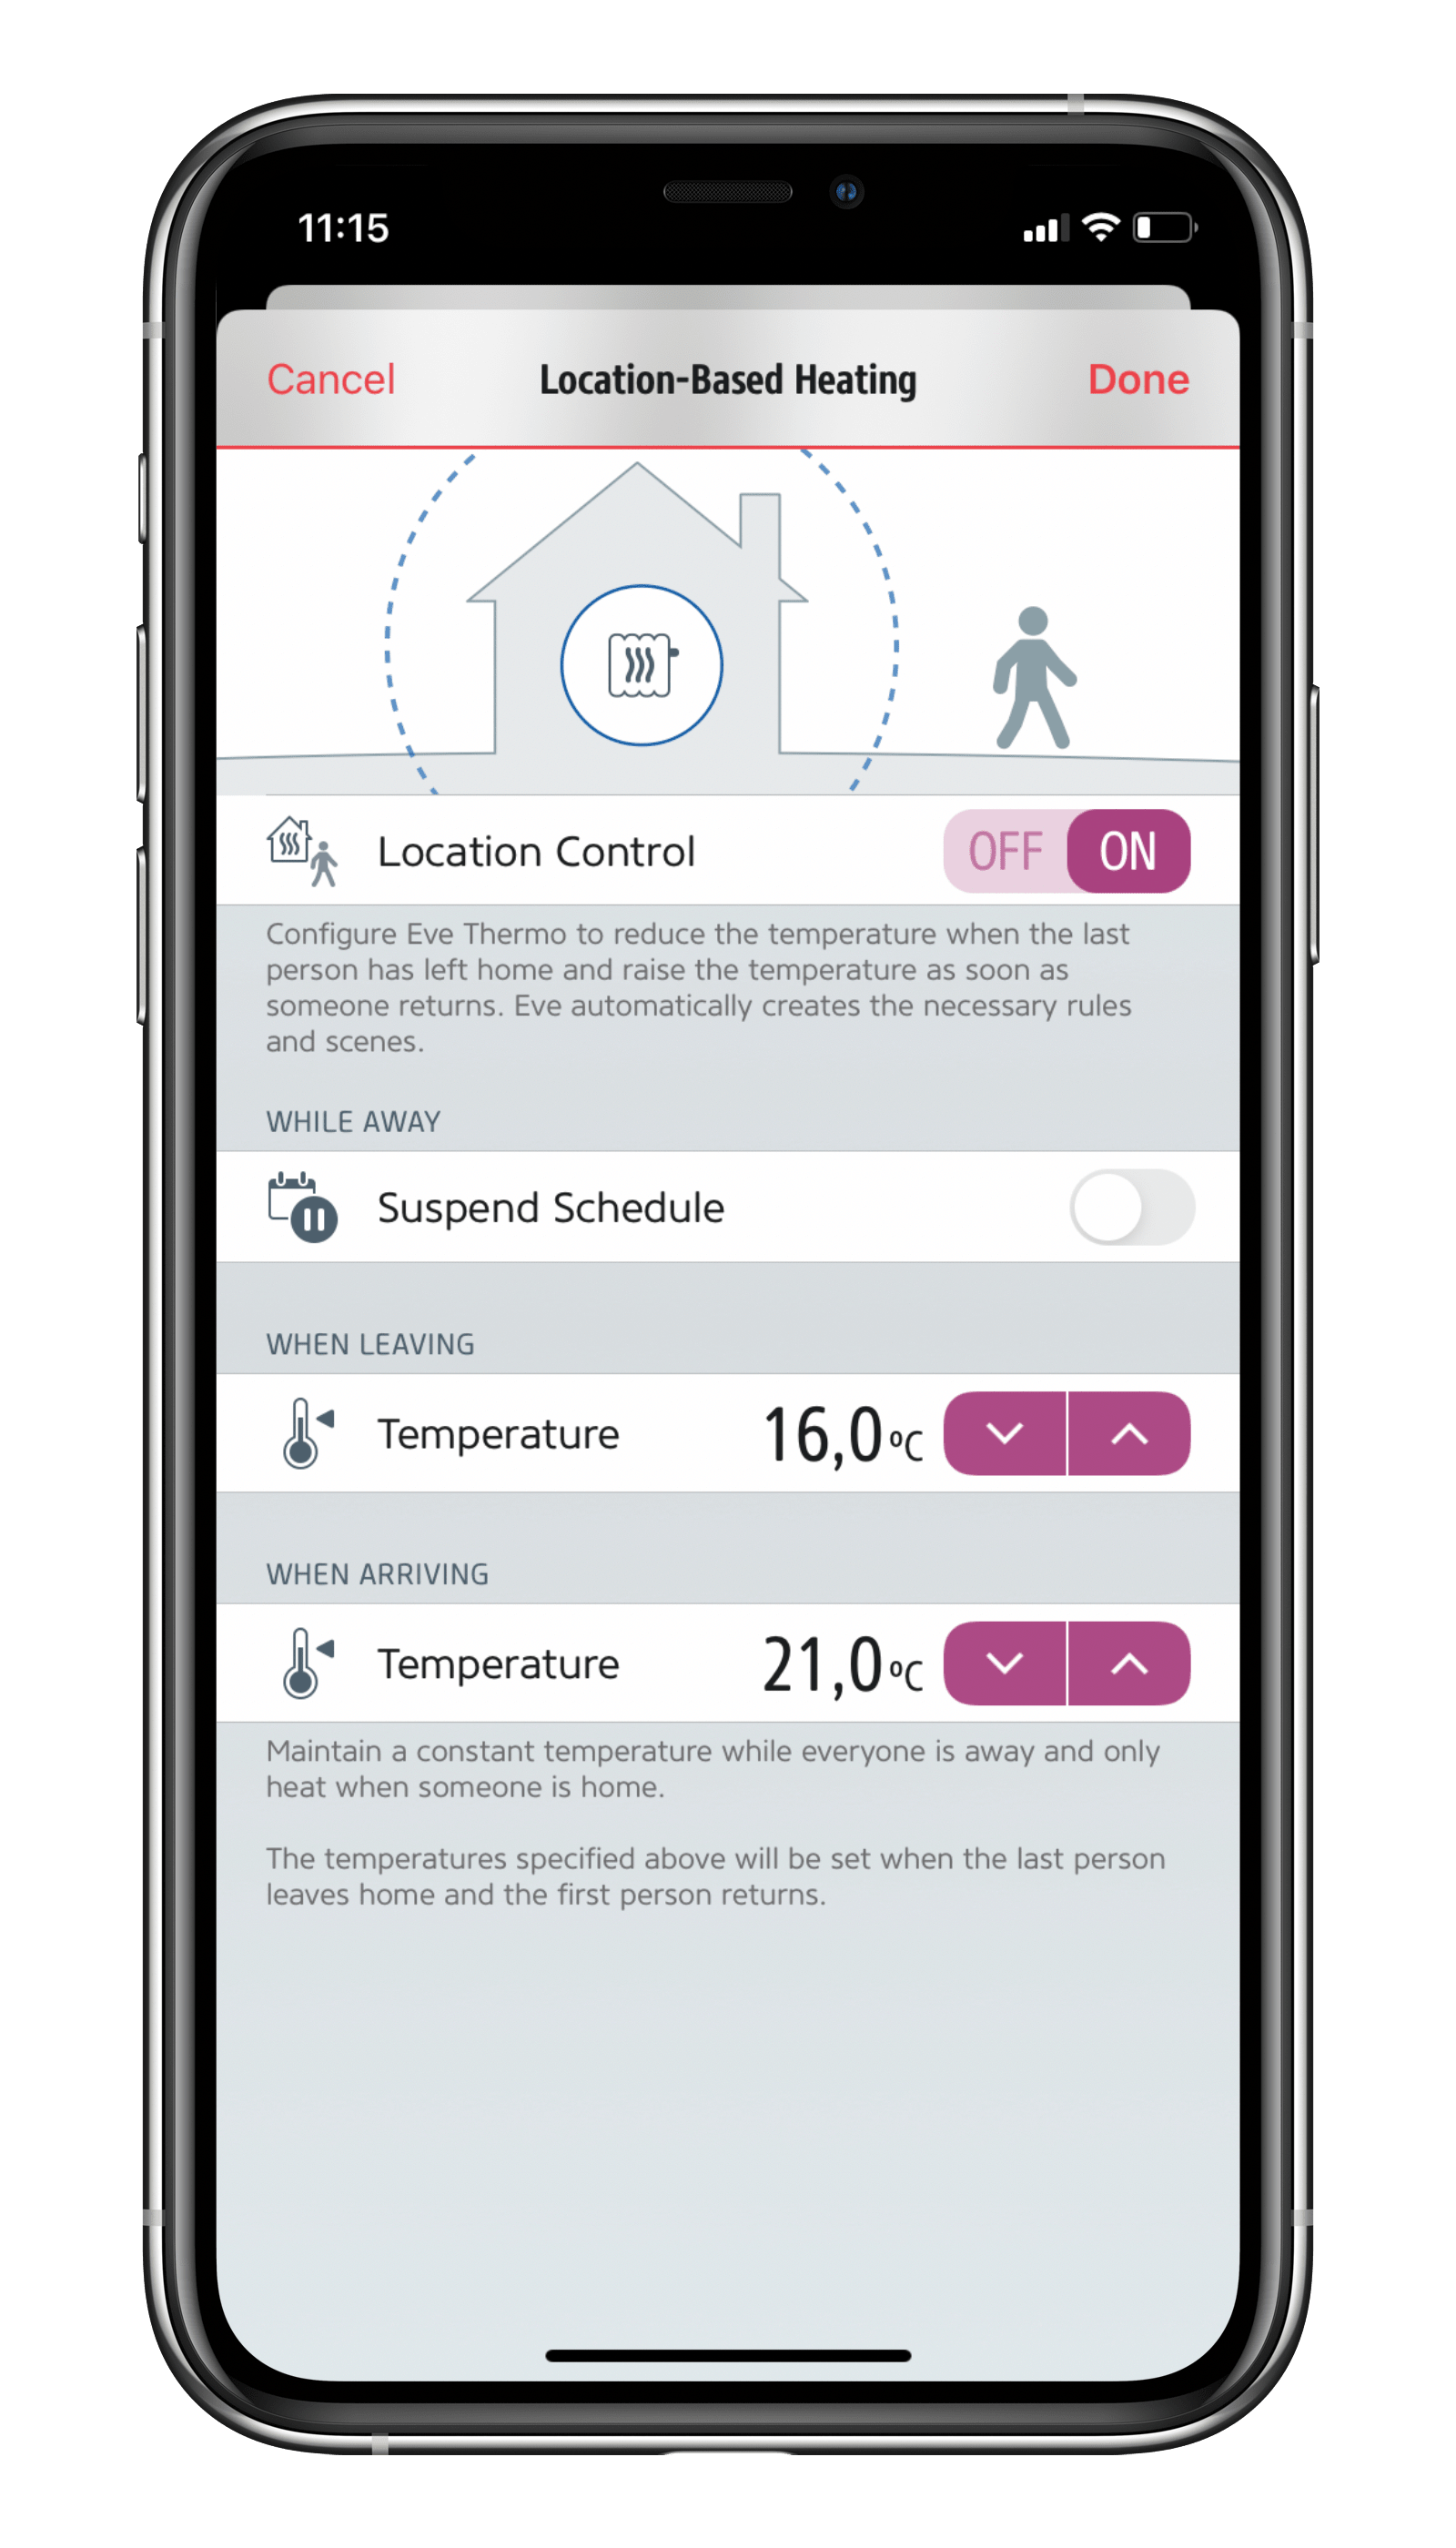
If you don’t want to use any schedules, you can rely exclusively on controlling your heating based on the location of all family members. With this, your heating will spring into action as soon as anyone arrives home – perfect if the room heats up again quickly or you don’t need it to be at your desired temperature immediately when you get home.

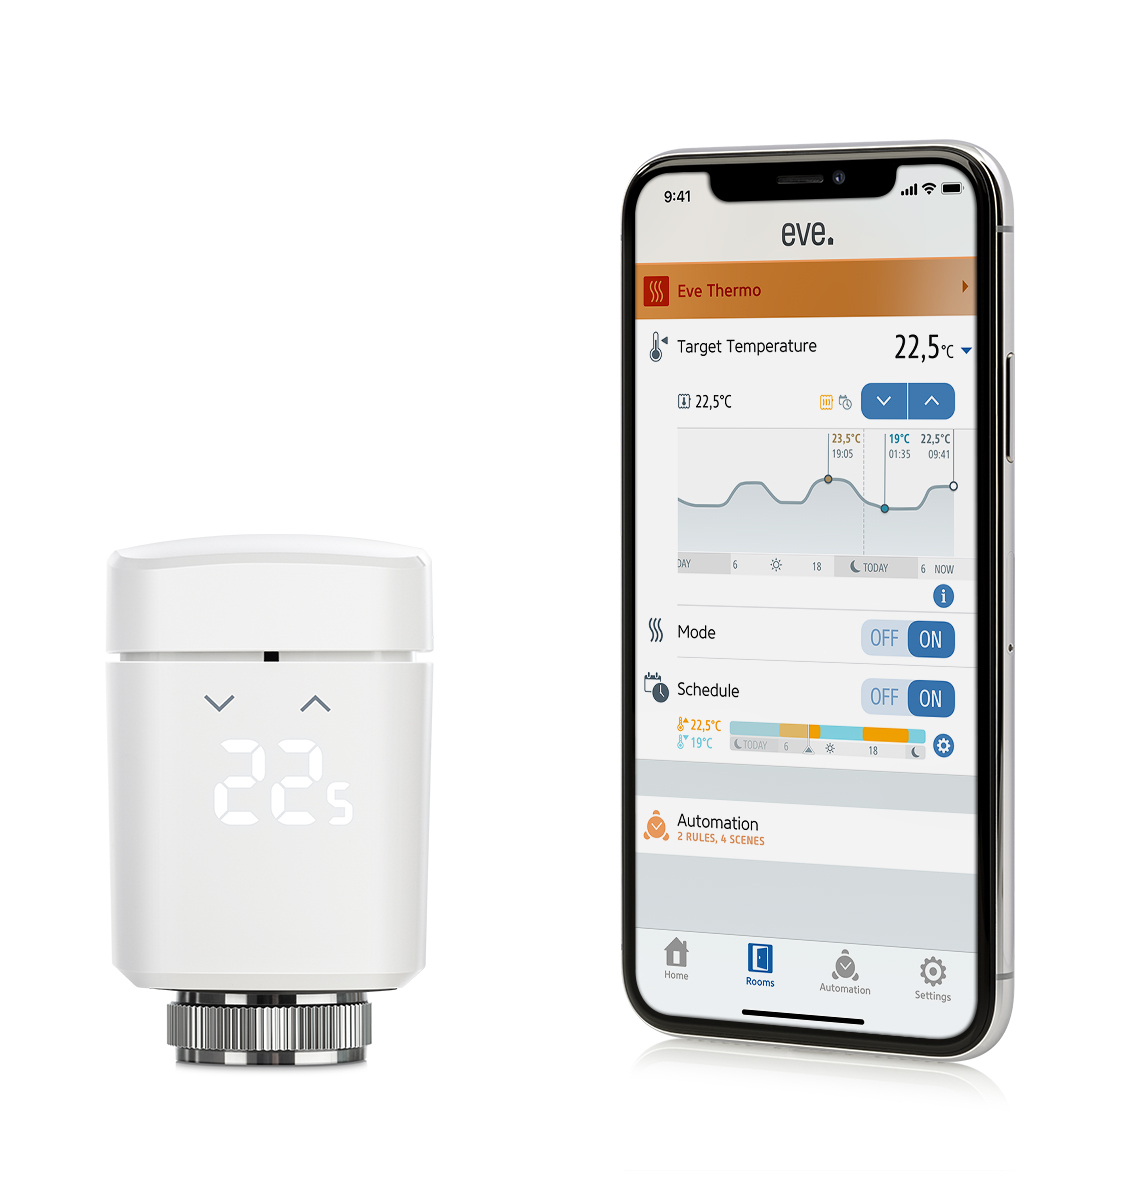
Eve Thermo in the Eve app

You can dive into Eve Thermo’s details view either by tapping the Rooms view in the Eve app or by long-pressing (or using 3D touch, if your device supports it) the particular accessory’s icon in the At a Glance view. Besides the accessory settings, the details view is the main dialog for controlling your smart radiator valve. It is divided into the General section, Target Temperature, Mode and Schedule.


General:
Tapping the small arrow on the right opens the advanced view, which includes a battery status indicator, an accessory settings icon and the identify button, which when tapped will display a “Hi” on the Eve Thermo in question. The latter is handy if you own several smart radiator valves and you want to make sure you’re in front of the right accessory when changing the batteries.  

Target Temperature: 
The central field of the detail view shows the current target temperature, which is the room temperature you want Eve Thermo to reach. Use the up/down buttons to adjust this value in 0.5 °C increments. 


The measured temperature currently measured by the accessory can be seen on the left above the graph in the form of a thermometer/heater icon. HomeKit treats the sensor in question just like a stand-alone temperature sensor or that of a wall-mounted thermostat or air conditioner. Siri and the display in the Home and Eve apps display this value as measured. Any configured temperature offset (see below) is not included in the calculation by the accessory or app. Discrepancies between the actual and target temperature during heating are normal, as factors such as the sensor being located on the radiator instead of in the center of the room (and also the configured temperature offset), the 10-minute measurement interval and the smart radiator valve’s control algorithm play a role here. If, for instance, you want to heat up a room again that has cooled down, the temperature measured at the radiator’s fully-opened valve will initially be significantly higher than the target and actual room temperature – and don’t forget that the same temperature will be displayed for 10 minutes until it’s refreshed.


A yellow radiator icon will also be displayed above the graph when Eve Thermo is currently heating. You will see a stopwatch next to the target temperature button when a schedule is active (any manual setting will only last until this particular schedule is due to start again).


The graph will show a timeline with the progressions for the measured  (gray) and target temperatures (blue). Daily highs and lows as well as the last measured temperature will be marked with dots. Tapping the small info icon will allow you to view the graph by hour, week or month. Additionally, you can stop the target temperature from being displayed in the graph, deactivate Graph Line Smoothing and access temperature readings in the list view.  

Mode: 
The Mode section lets you disable Eve Thermo’s heating function. The mode returns to On if you enter anything via the accessory’s touch controls or use Siri, automations or the Home app to trigger changes. However, please note that even when in the Off mode, valve descaling cycles, and a certain amount of noise in connection with that, will continue. The temperature will also continue to be measured. If radiator valves are grouped, switching off one accessory will not affect the others.


Schedule: 
The current schedule stored on the accessory is displayed in the bottom-most section. It can be deactivated permanently via the On/Off button – and will stay deactivated even after the next heating phase is reached. Tapping the gear icon will take you to the schedule section with the schedules contained in the Eve app and those added by you. You’ll find an info icon next to the latter, which you can tap to bring up the schedule editor.


Settings

You’ll find all the key functions, some of which you’ll have already seen during the initial setup, in the settings for Eve Thermo (Eve > Settings > [Room] > [Eve Thermo]). Starting from the top.


Room: This is where you’ll find the room you assigned your Eve Thermo to during installation. You can change it at any time. 


Name: This is the Siri name you set during the initial setup. Although entirely optional, a meaningful Siri name such as “Living Room Heating” can make controlling Eve Thermo with your voice a lot easier. 

Installation: Here you can see if Eve Thermo has been installed correctly (OK). If you want to use your accessory on a different radiator in your home, but want to keep the data, tap Installation >  Remove. You can now remove Eve Thermo and calibrate it at its new location. If you ended up installing the display upside down, you can change its orientation here.


Temperature Offset: As Eve Thermo connects right next to the radiator, which is often located under a windowsill, the values measured may deviate from the actual temperature in the center of the room. To compensate, you can configure a temperature offset which Eve Thermo factors in when controlling the valve. If the room temperature is lower than the measured temperature shown in the app, set the temperature offset to a negative value. For example, if your lounge is 20 °C, but Eve Thermo reports 21.5 °C, set the temperature offset to -1.5 °C. Over time, you’ll need to work towards finding the ideal temperature offset that works for the particular room.


Window Detection: If you use Eve Door & Window on a window in the room where you’re also using Eve Thermo, Eve can automatically stop heating if the window is opened for ventilation purposes. It then resumes heating once the window is shut. This type of automation requires Apple TV or a HomePod as a home hub.
Window Detection is smart: If you forget to shut the window, heating resumes automatically after 30 minutes to prevent the building from cooling down. However, you can adjust this value to suit. 

Eve Thermo detects rapid drops in temperature even without a wireless contact sensor, however it’s less precise than when used in conjunction with Eve Door & Window. In this mode Eve Thermo continues to heat again after 10 minutes. 


Vacation Mode: About to take a long vacation? To avoid having to adjust each radiator individually or add a different schedule, you can simply activate Vacation Mode. It’ll suspend your schedules, hold the energy-saving temperature you’ve set and prevent your home from freezing up. Here you can set whether the Eve Thermo in question should be part of the vacation scene and the temperature you want maintained. Once you’re back from vacation, simply activate the Back from Vacation scene and everything will return to normal. .

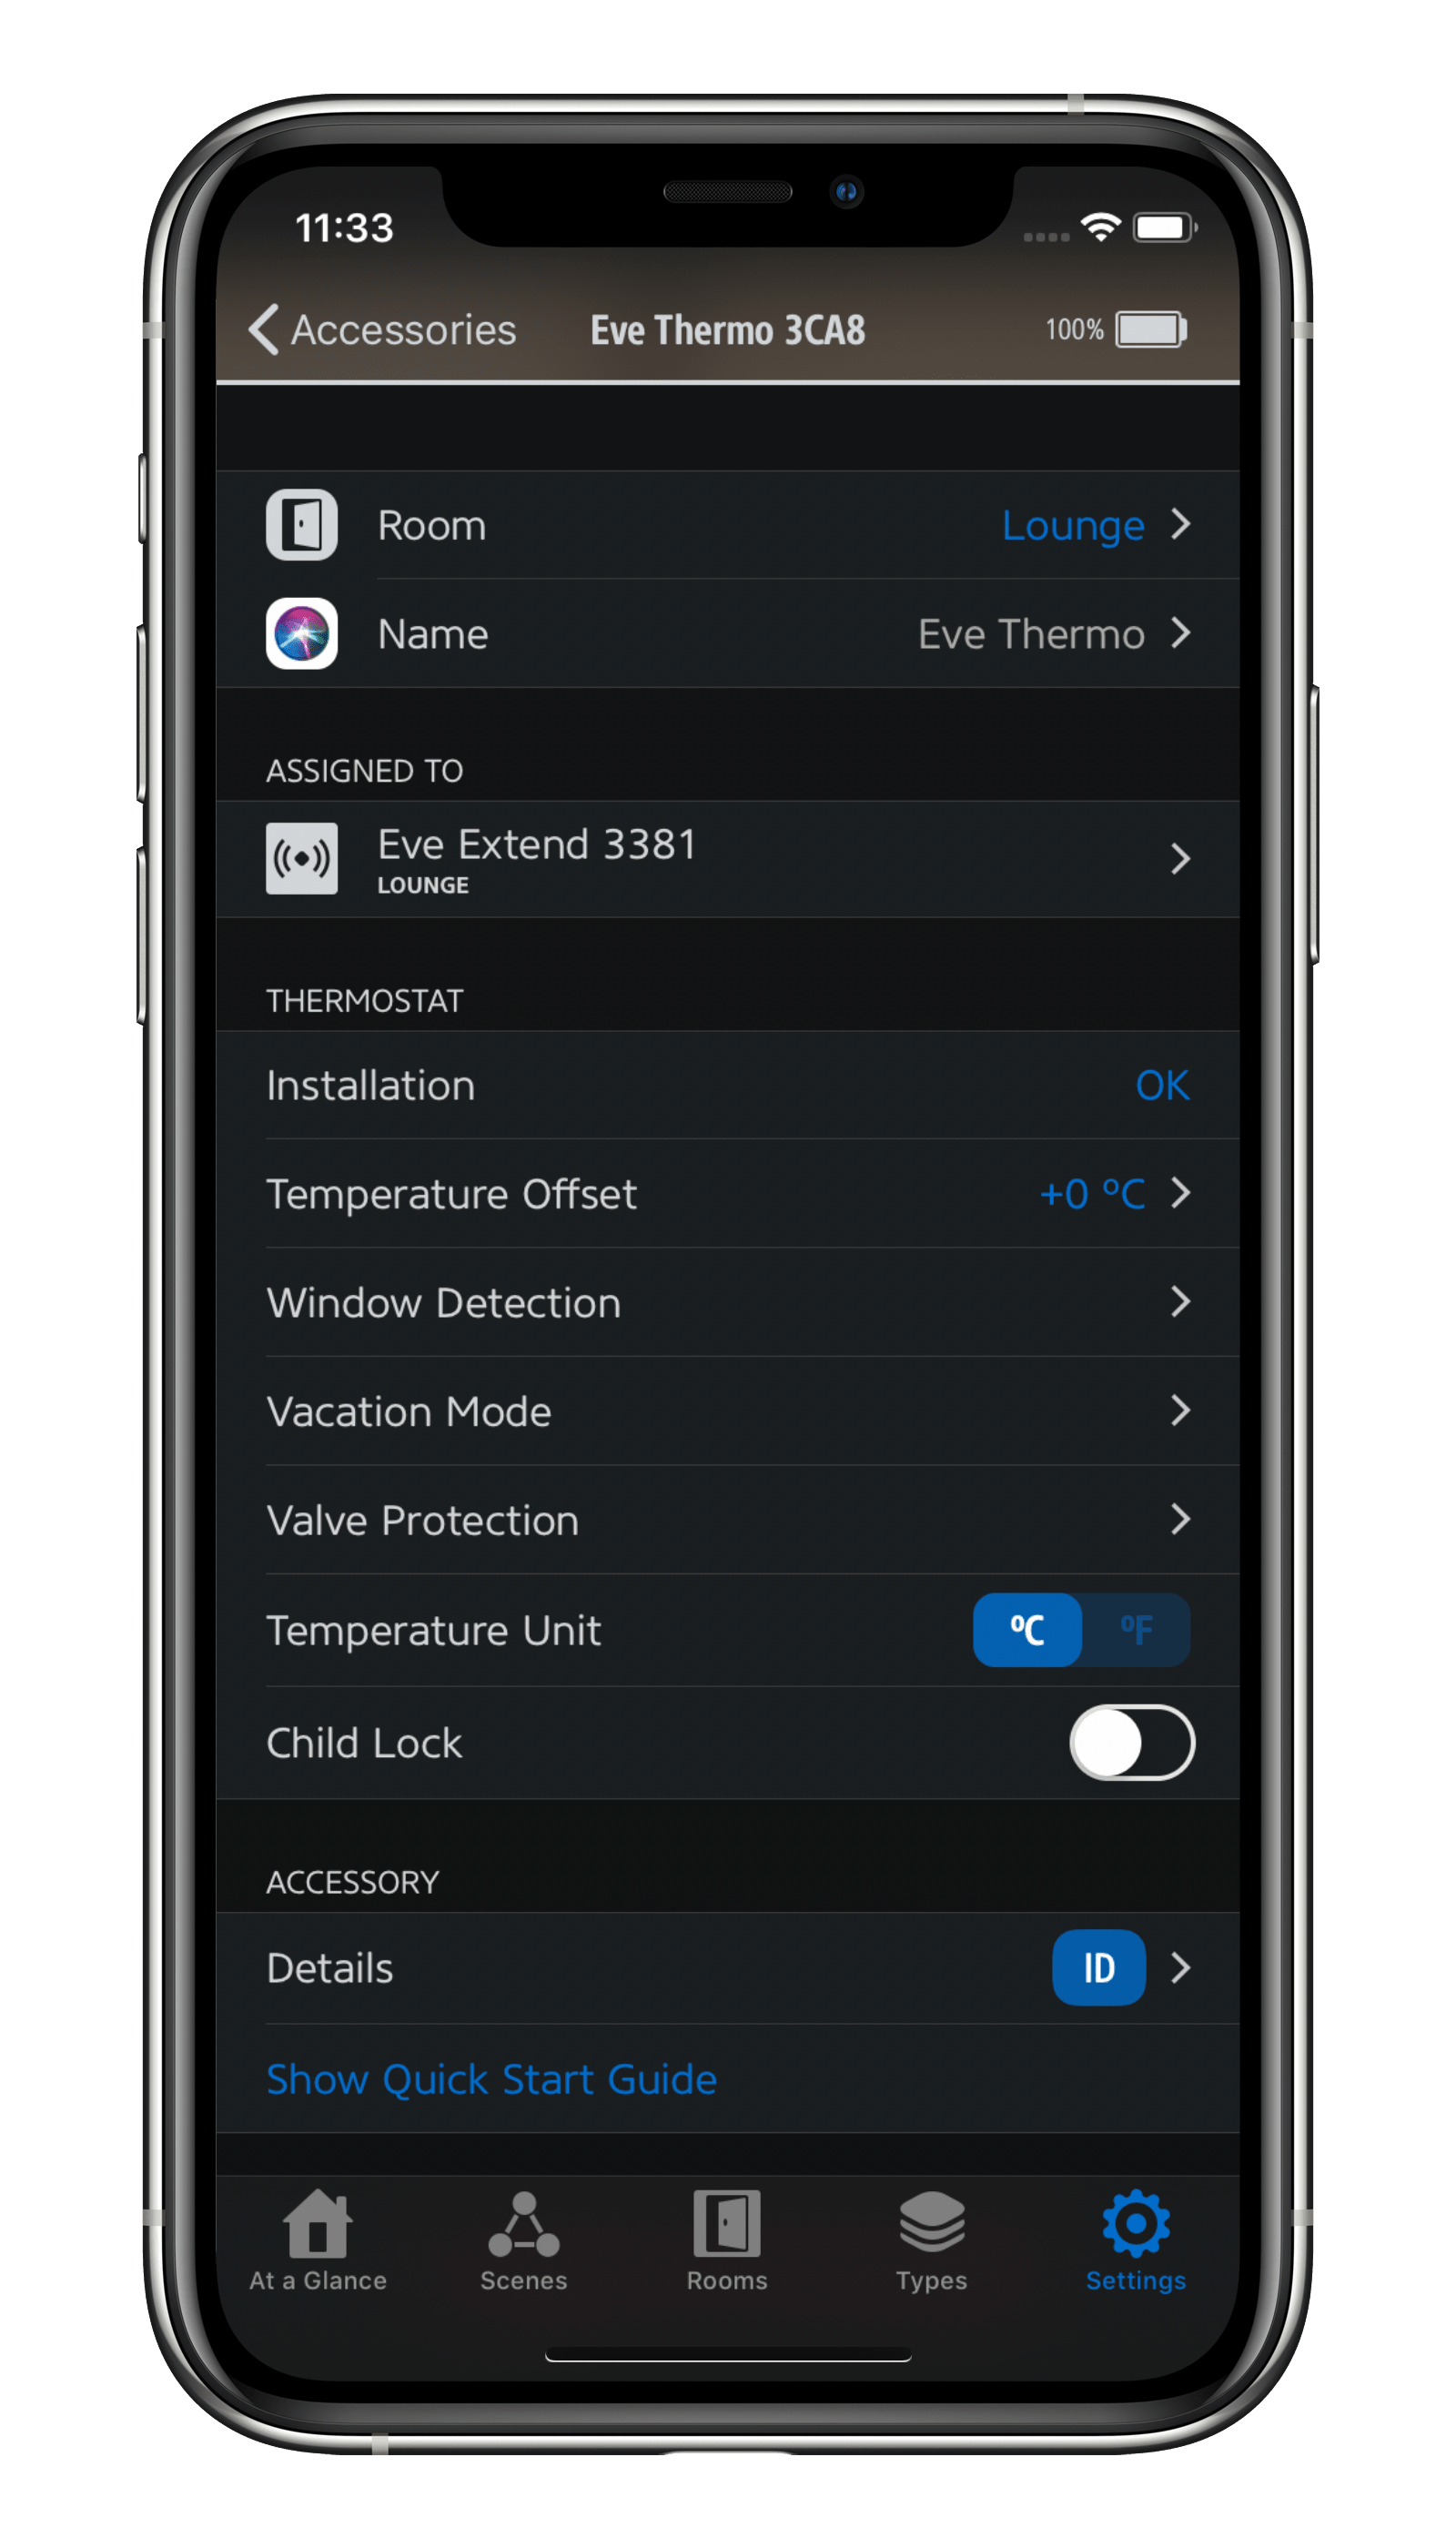
Valve Protection: Eve Thermo will open the valve fully every three weeks to prevent scale buildup. If you trigger this function manually, Eve Thermo will remember when you did so and resume automatic valve protection three weeks from that time of the day. 


Temperature Unit: Choose between Celsius and Fahrenheit. 


Child Lock: To prevent unwanted temperature adjustments, activate Child Lock to disable the touch controls of Eve Thermo. 


ID: Tapping ID will display Hi on the Eve Thermo in question. It’s really handy if you want to identify a particular Eve Thermo accessory.


Remove Accessory: This command lets you remove a particular Eve Thermo accessory from your HomeKit configuration. You may want to do this if you intend to relocate your accessory to a different home.


Assigned to (optional): If you have assigned Eve Thermo to an Eve Extend range extender, it will also appear here in the settings. 

No bridge or starter set required.

Eve Thermo works right out of the box, eliminating the need for additional accessories. Schedules are stored directly on the accessory itself, so they’re always executed without the involvement of any other devices. For automations (such as heating based on if you’re at home or away, or window detection in conjunction with Eve Door & Window), you’ll need a HomePod, HomePod mini or Apple TV as a home hub.


Increase the reach of your devices 

With a HomePod mini or the new Apple TV 4K in your home, your latest-generation Thread-enabled Eve Thermo can communicate over the Thread mesh network, reaching even the farthest corners of your abode. This happens automatically without you needing to configure anything. A Full Thread Device, such as Eve EnergyEve Light Switch or Eve Water Guard, can act as a router node and relay data packets from other Thread products, such as Eve Thermo. 


To view the structure of your Thread network and see where you can make improvements, simply go to the Settings area of the Eve app and tap Thread Network. Among other things, you’ll be able to tell which nodes your Thread devices use to communicate and whether you can further improve the stability and reach of your network and devices by adding one more Full Thread Device or moving one to a better location.

Learn here how to install Eve Thermo 

Smart Radiator Valve
Learn more

Requires iPhone or iPad with the latest version of iOS/iPadOS

 
HomeKit, supports Thread
Add to cart
Your choice
Add to cart
incl. VAT, plus shipping
Your choice
Select your country
Wireless Contact Sensor
Learn more

Requires iOS/iPadOS 16.4 (or later) / Android™ 8.1 (or later), Matter controller / Thread Border Router

 
Supports Matter & Thread
Add to cart
Your choice
Add to cart
incl. VAT, plus shipping
Your choice
Choose your country
487 Comments
Daniela
Hallo. Vielleicht kann mir ja jemand helfen. Hab mir fürs Kinderzimmer die eve Thermo gekauft. Die app kann ich nur über ein Apple Gerät laden, hab es über mein IPAD zwar schon probiert, aber leider kommt da dann die Meldung ich benötige IOS 14. Meins hat aber gerade 12.5.6, wurde heute erst aktualisiert. .. ansonsten hab ich nur ein normales Samsung Handy. Gibt es die Möglichkeit die App auch darauf zu bekommen?
Viele Grüße Daniela
Reply
Sep 28, 2022
Hallo Daniela! Sie benötigen ein aktuelleres iOS-Gerät/iPad, mit dem alten Modell wird es nicht klappen. Aktuell wird Android, Alexa oder Google Home nicht unterstützt. Das mag sich später in diesem Jahr ändern mit dem neuen Standard Matter. Viele Grüße, Volker
Reply
Sep 29, 2022
Burim
Hi Volker, um sich zu gehen, muss auch ich einmal bzgl. der Temperaturabweichung nachfragen.
Nachdem was ich bisher auf dieser Seite gelesen habe, muss für die Abweichung die Solltemperatur herangezogen werden - nicht die von EVE Thermo gemessene - richtig?
Die Erklärung in der App ist unklar. Auf der Eve Homepage wird m.M.n. das Gegenteil behauptet. Also dass der Offset auf Basis der vom EVE Thermo GEMESSENEN Temperatur einzustellen ist:
Temperaturabweichung: Eve Thermo ist sehr nah am Heizkörper installiert, oft auch unter Fensterbänken. Dort gemessene Werte können von der Temperatur in der Raummitte abweichen. Deshalb kannst du eine Temperaturabweichung (Offset) einstellen, die Eve Thermo bei der Regelung berücksichtigt. Ist also die Raumtemperatur niedriger als die in der App angezeigte Umgebungstemperatur, setze die Abweichung auf einen negativen Wert. Sind es bei dir im Wohnzimmer beispielsweise 20 Grad, obwohl das Thermostat 21,5 Grad meldet, setzt du die Abweichung auf -1,5. Je nach Räumlichkeit musst du dich an die optimale Abweichung über eine gewisse Zeit annähern.

Danke und viele Grüße
Burim
Reply
Sep 28, 2022
Hallo Burim,
Nach der Installation und Kalibration in der App Eve nehmen Sie bitte einmalig die Grundeinstellung vor.

Wichtig: Die unter Temperatur Zielwert angezeigte Temperatur in Eve ist von Eve Thermo viel zu dicht am Heizkörper gemessen, bitte ignorieren Sie den Wert. Auch wenn die Temperaturabweichung gesetzt ist, wir der Wert nicht in die Darstellung eingerechnet.

Um Eve Thermo einzustellen öffnen Sie die App Eve und gehen zu
Einstellungen > Geräte > Eve Thermo
Stellen Sie die Temperaturabweichung auf 0 Grad.

Dann öffnen Sie in Eve Räume > Eve Thermo und öffnen Eve Thermo.
Stellen Sie Temperatur Zielwert auf zum Beispiel 23 Grad und heizen für 2-3 Stunden.
Messen Sie dann die in Raummitte erreichte Temperatur mit einem Thermometer, Eve Degree oder Eve Room.
Wenn hier zum Beispiel 20,5 Grad erreicht werden, gehen Sie in Eve zu
Einstellungen > Geräte > Eve Thermo und stellen die Temperaturabweichung auf -2,5 Grad.

Es ist möglich, dass Sie den Wert über die folgenden Tage nachstellen müssen.
Wie schon gesagt, wird die gewählte Temperaturabweichung nicht in den Wert der angezeigten/gemessenen Temperatur eingerechnet.
Viele Grüße, Volker
Reply
Sep 29, 2022
Harald
Ich besitze 2 ältere Eve Thermo, die noch nicht Thread-Kompatibel sind und die über ein iPad gesteuert wurden.
Wie kann ich die „Thermos“ weiter benutzen, falls das iPad auf ein aktuelles Systems (iPadOS 16) aktualisiert wird und es eine neue Home-Software gibt ?
Sind meine anderen Eve-Geräte (Eve Energy, Eve Energy Strip) dann weiter verwendbar oder für die „Tonne“ ?
Reply
Sep 26, 2022
Hallo Harald! Sie werden weiter unterstützt, ich würde mir als Steuerzentrale allerdings ein Apple TV 4/4K oder einen HomePod/mini besorgen, dann sind Sie auf der sicheren Seite. Viele Grüße, Volker
Reply
Sep 27, 2022
Fred
Hi Eve team,
I've installed two Eve Thermos in two rooms, but I'm probably doing something wrong. For example, if I set 22 degrees, the radiator only gets a little warm.
My screen on the Eve app also looks very different from the example on the box and I also see an exclamation mark next to both rooms.
To be honest, I also find the English explanation on the various sites a bit too complicated. Is there also a Dutch manual and/or FAQ?
I hope you can help.
Reply
Sep 24, 2022
Hello Fred!
One added Eve Thermo communicates using Bluetooth so your have to be in range, max 6-8 meters. In case you are using a HomePod mini or the new Apple TV 4K (2nd generation) it will use Thread with more range.

After installation and calibration in the Eve app, please do the basic setting once.

How to set up Eve Thermo including the Offset

Important note: The temperature displayed below Target Temperature in Eve is measured by Eve Thermo way too close to the heater, please ignore it. Once an Offset is set, it will not be integrated here.

To set up Eve Thermo open the app Eve and goto
Settings > Accessories > Eve Thermo
Set Temperature Offset to 0 degrees.

Then in Eve goto Rooms > Eve Thermo and open Eve Thermo.
Set Target Temperature to 23 degrees for example and let it heat for 2-3 hours.
Then measure the temperature in the middle of the room with a thermometer, Eve Degree or Eve Room.
If it reads for example 20,5 degrees, goto
Settings > Accessories > Eve Thermo and set the Temperature Offset to -2,5 degrees.

You may have to adjust this over the next days a bit.
As stated before, the Temperature Offset is not taken into account in the temperature shown below Target Temperature.

Best regards, Volker
Reply
Sep 25, 2022
Markus
Mein Fenster Erkennung lasst sich nicht auf „EIN“ stellen. Ein rotes Dreieck mit Ausrufezeichen steht davor. Hab es schon neu installiert. Aber es will sich nicht verbinden. Fenster offen oder geschlossen wird angezeigt.
Reply
Sep 19, 2022
Hallo Markus! Eve Thermo und Eve Door & Window müssen in Eve demselben räum zugeordnet sein. Zudem handelt es sich um eine Automation, also ist eine Steuerzentrale (Apple TV 4/4K und/oder HomePod/mini) voraus gesetzt. Sind die in Reichweite, lässt sich die Fenstererkennung auch aktivieren. Viele Grüße, Volker
Reply
Sep 20, 2022
Philipp
Hallo! Ich habe an meinem Eve Thermo in der Küche einen Zeitplan eingerichtet, dass ab 20:00 Uhr die Sparen Temperatur auf 17 Grad gesenkt wird.
Nach 20 Uhr zeigt der Sensor noch eine Temperatur von 20 Grad am Heizkörper an (Temperaturabweichung steht auf -1,5 Grad). Folglich sollte sich der Raum jetzt ja noch weiter abkühlen.
Das Ventil ist allerdings geöffnet. Es wird der Messwert 2% angegeben. Sollte er nicht auf 0% stehen?
Vielen Dank im Voraus für eine Antwort.
Beste Grüße
Philipp
Reply
Sep 18, 2022
Hallo Philipp! Nach der Installation und Kalibrierung in Eve müssen Sie einmalig die Temperaturabweichung ermitteln und einstellen, dann passt es auch. Viele Grüße, Volker

So stellen Sie Eve Thermo ein, inklusive der Temperaturabweichung

Wichtig: Die unter Temperatur Zielwert angezeigte Temperatur in Eve ist von Eve Thermo viel zu dicht am Heizkörper gemessen, bitte ignorieren Sie den Wert. Auch wenn die Temperaturabweichung gesetzt ist, wir der Wert nicht in die Darstellung eingerechnet.

Um Eve Thermo einzustellen öffnen Sie die App Eve und gehen zu
Einstellungen > Geräte > Eve Thermo
Stellen Sie die Temperaturabweichung auf 0 Grad.

Dann öffnen Sie in Eve Räume > Eve Thermo und öffnen Eve Thermo.
Stellen Sie Temperatur Zielwert auf zum Beispiel 23 Grad und heizen für 2-3 Stunden.
Messen Sie dann die in Raummitte erreichte Temperatur mit einem Thermometer, Eve Degree oder Eve Room.
Wenn hier zum Beispiel 20,5 Grad erreicht werden, gehen Sie in Eve zu
Einstellungen > Geräte > Eve Thermo und stellen die Temperaturabweichung auf -2,5 Grad.

Es ist möglich, dass Sie den Wert über die folgenden Tage nachstellen müssen.
Wie schon gesagt, wird die gewählte Temperaturabweichung nicht in den Wert der angezeigten/gemessenen Temperatur eingerechnet.
Reply
Sep 19, 2022
Guten Abend.

Ich bin ehrlich gesagt sehr verwundert, dass die Eve Thermo sich nicht mit externen Thermometern verbinden lassen.
Das, was Sie beschreiben, ist im Grunde ein geschlossener Regelkreis. Nur, dass der Kunde diesen von Hand ausführen muss. Smart ist anders, finde ich...
AVM macht dies deutlich eleganter:
Es gibt eine Steuereinheit mit Display, die auch Thermostate steuern kann und ein Thermometer verbaut hat.
Dieses Gerät kann man im Raum mit sich herumtragen und das Thermostat heizt auf die Wunschtemparatur "am Sitzplatz".
Ist hier für die Zukunft ein Update geplant?
Reply
Sep 19, 2022
Hallo Marcus! Es handelt sich bei unseren geraten um HomeKit-Geräte, das läuft komplett anders. Aktuell ist es genau so, wie beschrieben. Ob sich das eines Tages ändert/ändern kann, weiß ich leider nicht. Viele Grüße, Volker
Reply
Sep 20, 2022
Danke für die Antwort, aber das hilft nur bedingt weiter.

Ich habe das jetzt länger beobachtet und die Messungen notiert und deshalb zwei Fragen.

Frage 1:
Ich habe tagsüber
- Zieltemperatur 20 Grad
- Messe in Raummitte 20 Grad (passt also)
- Eve gibt 22,5 Grad an
- Abweichung ist aber weiterhin die Werkseinstellung -1,5 Grad

Wie passt das zusammen?

Frage 2:
Ich möchte nachts eine Absenkung auf 17 Grad.
- Also Zieltemperatur 17 Grad
- Messe in Raummitte aber 20 Grad
- Eve gibt auch mehr an (20 Grad)
- Abweichung ist aber weiterhin die Werkseinstellung -1,5 Grad

Ich habe also eigentlich permanent in der Raummitte 20 Grad und die App zeigt mir auch tatsächlich an, dass das Ventil nachts geöffnet ist. Nachts nur gering, aber trotzdem sehr ärgerlich, da ich eigentlich ja 0 Verbrauch will, da ich eine Absenkung auf bis zu 17 Grad hinnehmen würde.

Vielen Dank für eine Antwort.
Philipp
Reply
Sep 22, 2022
Hallo Philipp! Sie müssen wie beschrieben zunächst die Temperaturabweichung ermitteln und dann einstellen. Die Werkseinstellung ist nur ein Wert, der für viele Kunden paar. Viele Grüße, Volker
Reply
Sep 23, 2022
Kann ich machen, aber die Frage 2 bleibt doch:

Warum ist nachts das Ventil trotzdem (gering) auf, obwohl als Zieltemperatur etwas geringeres gewünscht ist, als die von Eve gemessene Temperatur minus Temperaturabweichung?

Ab welcher Differenz zwischen niedriger Zieltemperatur und von Eve gemessener Temperatur wird denn das Ventil auf 0% gestellt und nicht mehr ungewünscht nachgeheizt? Nicht, dass sich das mit höherer Temperaturabweichung noch weiter verschlechtert…

Grüße
Philipp
Reply
Sep 23, 2022
Christian W
Guten Morgen, wir bekommen einen neuen Heizkörper. An dem alten Heizkörper ist bereits ein EVE Thermo installiert, den ich nun entfernen und wieder einbauen möchte, sobald der neue Heizkörper eingebaut ist. Der EVE Thermo ist zudem Teil einer Gruppe. Gibt es ein Vorgehen, wie man den EVE Thermo am besten deinstalliert / abmontiert? Muss ich ihn vor dem Abschrauben aus „mein zu Hause“ entfernen.
Reply
Sep 5, 2022
Hallo Christian! Ich würde hier komplett neu beginnen, da auch Kalibrierung und Grundeinstellung neu müssen. Ich würde Eve Thermo aus dem (alten) Zuhause entfernen und zurücksetzen - wie übrigens alle anderen Geräte auch. Dann im neuen Zuhause hinzufügen und Kalibrieren. Viele Grüße, Volker
Reply
Sep 6, 2022
Super, Danke. Mache ich so. "Alle anderen Geräte auch", heißt vermutlich nicht, dass alle unsere (anderen) Geräte entfernt und zurück gesetzt werden müssen, wenn wir einen neuen Heizkörper installieren? Aber immer wenn wir ein existierendes Gerät an einem neuen Ort (auch im selben "zu Hause") installieren, sollten wir dieses Gerät komplett zurücksetzen? Ist das so korrekt verstanden?
Die Info ist hilfreich, weil wir demnächst ggf. auch Lichtschalter an eine andere Stelle setzen werden.
Reply
Sep 6, 2022
Hallo Christian! Bei einer neuen Wohnung an einem anderen Ort würde ich es immer so machen, alles neu aufsetzen. Am selben Ort nicht unbedingt. Ich würde es allein wegen ortsbasierter Regeln immer machen. Viele Grüße, Volker
Reply
Sep 7, 2022
Ratko
I have Herz TRV. Do I get proper adapter for it when I buy Eve thermo valve?
Reply
Aug 7, 2022
Hello Ratio! Herz valves are M28x1,5, Eve Thermo comes with the standard M30x1,5.
You need an adapter:
Herz M28x1,5 auf M30x1,5
https://www.amazon.de/gp/product/B0028YCQNA/
https://www.wolf-online-shop.de/HEIMEIER-Adapter-fuer-Herz-Ventile::666.html
Best regards, Volker
Reply
Aug 8, 2022
Stephen
Hallo,

Ich würde gerne die herkömmlichen Thermostate in einem Verwaltungsgebäude durch Eve Thermo ersetzen. Mich nervt es schon seit Jahren (auch ohne die Gasproblematik), dass die Mitarbeiter meinen im Winter bei tropischen Temperaturen arbeiten zu müssen.

Momentan sind 26 Heizkörper in Betrieb, gibt es bei Eve eine mengenmäßige Obergrenze ?
Reply
Aug 7, 2022
Hallo Stephen! Nein, für normale Installationen gibt es keine Obergrenze in dem genannten Bereich. Sie werden allerdings mindestens eine Steuerzentrale benötigen zumindest für Fernzugriff und Automationen. IM Falle von Eve Thermo einen HomePod mini oder das neue Apple TV 4K (2. generation), dann läuft die Kommunikation über Thread. Je nach Fläche werden Sie such noch ein paar stromversorgte Thread-fähige Geräte benötigen, um das Thread-Netzwerk per Mesh zu erweitern). Bitte lesen Sie dazu den Blog-Post von Slavicus: https://www.evehome.com/de/blog/durchleuchte-dein-thread-netzwerk
Viele Grüße, Volker
Reply
Aug 8, 2022
Dr. Philipp Zollmann
Ich habe eine Wärmepumpe mit Kühlfunktion. Das bedeutet, dass ich zum kühlen bei warmen Außentemperaturen die Thermostate aufdrehen muss. Das geht manuell nur bis 30°, Sie sind also in der Regel ausgestellt, also kein Wasserfluss. Kann man manuell die Thermostate auf durchgehenden Wasserfluss einstellen ? Oder muss ich die Thermostate im Sommer abschrauben?
Vielen Dank für einen kurzen Tipp. Gruß Philipp
Reply
Jun 18, 2022
Hallo Philipp! Dieselbe Frage haben Sie ja auch im Support gestellt, die Antwort ist dieselbe: Für den Einsatz ist Eve Thermo nicht geeignet. Viele Grüße, Volker
Reply
Jun 19, 2022
Ralph
Hallo,
bei den vielen Informationen kann man es bestimmt nachlesen.
Aber ich finde es nicht.
Mein Thermo ist bei Homekit eingeschaltet und das Ventil ist z.B. halb offen.
Was passiert, wenn ich das Thermo bei Homekit ausschalte?
Bleibt das Ventil in der aktuellen Stellung, oder fährt es zu?

Ranke im Voraus
Ralph
Reply
Jun 10, 2022
Hallo Ralph! Schalten Sie sowohl Modus, als auch Zeitplan aus, dazu alle integrierten Automationen (in Eve) wie die Fenstererkennung. Dann ist das Ventil geschlossen und bleibt es auch. Viele Grüße, Volker
Reply
Jun 11, 2022
Jakub
I’m planning to relocate abroad for up to 1 year. Is there any documentation on what happens with an Eve Thermo when it rund out of battery? Does it enter some safe-mode? What position does it leave the valve in?
Reply
May 17, 2022
Hello Jakub! This can be tricky. The only secure way would be to replace the Eve Thermo with the old manual thermostat. Best regards, Volker
Reply
May 18, 2022
Thomas Köppl
Hallo,
Es wäre super, wenn ein einfaches Häkchen integriert werden würde etwa mit der Bezeichnung Sommer. Dann wäre außerhalb der heizperiode alles abgeschaltet. Im Herbst Häkchen weg und es ist wieder alles bereit….
Reply
May 17, 2022
Hallo Thomas! So etwas geht leider nicht, es müsste ja 'wissen' welche Automationen genutzt oder erstellt wurden. Viele Grüße, Volker
Reply
May 18, 2022
Peter
Hallo Eve Team
Mit den Thermostaten und door&Window bin ich ziemlich zufrieden, über den Winter hat auch alles gut funktioniert. Nun wird bei der wärmeren Jahreszeit die Heizung nicht mehr benötigt, daher habe ich die entsprechenden Automationen, Thermostate und Zeitpläne ausgeschaltet.
Allerdings reagieren die Thermostate immer noch, wenn ein Fenster geöffnet. Heißt, wenn ich das Fenster öffne wird auf dem Thermostat pausieren angezeigt, wenn das Fenster geschlossen wird, zeigt das Thermostat wieder aus an. Wenn die Heizung sowieso auf aus ist macht das doch keinen Sinn, anderseits ist es verständlich, da door& w
Reply
May 9, 2022
Hallo Peter! Öffnen Sie Eve Thermo in der App Eve und schalten Modus und Zeitplan auf Aus. Dann tippen Si in dem Fenster weiter unten auf Automation. Bitte schalten Sie die drei Automationen aus for Fenstererkennung, Anwesenheitsbasiert und Urlaubseinstellung. Dazu deaktivieren Sie auch alle selbst erstellten Automationen, bei denen Eve Thermo in einer Szene vorkommt. Viele Gruße, Volker
Reply
May 10, 2022
Vielen Dank, so kann ich das für jedes Thermostat manuell einstellen, heißt ich mache das über 10 mal. Gibt es aber eine Möglichkeit alle Thermostate zusammen zufassen, so dass ich mit einem Schalter die Fenstererkennung usw. für alle Thermostate aus und wieder einschalten kann.
Danke Peter
Reply
May 13, 2022
Hallo Peter! Die Fenstererkennung muss pro Eve Thermo aktiviert und deaktiviert werden. Es handelt sich jeweils um Automationen. Viele Grüße, Volker
Reply
May 13, 2022
Rohin
Hi,
I’m thinking about buying a few Eve thermos for my flat. One question I couldn’t find answered anywhere: does it also include a humidity sensor (which is also accessible in the Eve app/Home app)?

Thank you!
Reply
Apr 19, 2022
Hello Robin! Eve Thermo does not feature a sensor for humidity. Both Eve Room and Eve Weather do. Best regards, Volker
Reply
Apr 21, 2022
Christopher
Ich habe alle meine Heizkörper mit einen Eve Thermo ausgestattet (8 insgesamt) und auch echt sehr glücklich damit.
Ich habe in den meisten Räumen auch ein Raumthermostat welches mir die echte Raum Temperatur anzeigt.
Anhand dieser Temperatur habe ich auch das Offset im Thermo eingestellt.
Allerdings stört es mich sehr, das das Eve Thermo immer noch den Wert der gemessen Temperatur übermittelt und nicht das Offset abzieht.
Beim einstellen der Temperatur funktioniert es ja auch.
Sagen wir ich habe ein Offset von 2 Grad, dann sage ich HomeKit der Raum soll auf 21 Grad geheizt werden.
HomeKit steht auf 21 Grad und das Eve Thermo weiß, dass es auf 23 heizen soll.
Allerdings übermittelt das Eve Thermo als gemessen Wert weiterhin 23 Grad obwohl es ja von dem Offset weiß.
Dies führt dazu, dass HomeKit in der Übersicht sagt, dass es in dem Raum 21-23 Grad sind.

Wieso kann das Thermo nicht einfach die gemessene Temperatur minus das Offset an HomeKit übermitteln?
Da HomeKit so etwas wie offsets nicht kennt, müsste die Berechnung direkt im Thermo stattfinden.

Bitte auf eure Verbesserungsliste für zukünftige Updates schreiben.
Gerne auch für die Vorgänger Versionen von dem Thermo, da ich hiervon auch noch 3 habe die wunderbar funktionieren und es wäre schade diese auszutauschen nur weil die Funktion nicht nachgeliefert wurde.

Viele Grüße
Reply
Apr 19, 2022
Hallo Christopher! Die unter Temperatur Zielwert angezeigte Temperatur in Eve ist von Eve Thermo viel zu dicht am Heizkörper gemessen, bitte ignorieren Sie den Wert. Auch wenn die Temperaturabweichung gesetzt ist, wir der Wert nicht in die Darstellung eingerechnet.

Um Eve Thermo einzustellen öffnen Sie die App Eve und gehen zu
Einstellungen > Geräte > Eve Thermo
Stellen Sie die Temperaturabweichung auf 0 Grad.

Dann öffnen Sie in Eve Räume > Eve Thermo und öffnen Eve Thermo.
Stellen Sie Temperatur Zielwert auf zum Beispiel 23 Grad und heizen für 2-3 Stunden.
Messen Sie dann die in Raummitte erreichte Temperatur mit einem Thermometer, Eve Degree oder Eve Room.
Wenn hier zum Beispiel 20,5 Grad erreicht werden, gehen Sie in Eve zu
Einstellungen > Geräte > Eve Thermo und stellen die Temperaturabweichung auf -2,5 Grad.

Es ist möglich, dass Sie den Wert über die folgenden Tage nachstellen müssen.
Wie schon gesagt, wird die gewählte Temperaturabweichung nicht in den Wert der angezeigten/gemessenen Temperatur eingerechnet.
Viele Grüße, Volker
Reply
Apr 21, 2022
Hallo Volker, wie die Temperaturabweichung, zu messen und einzustellen ist, habe ich schon verstanden mir geht es eigentlich nur um den angezeigten Wert. Warum kann das Thermo nicht den gemessenen Wert minus die Temperaturabweichung als Ist-Wert an HomeKit senden?
Viele Grüße Christopher
Reply
May 14, 2022
Hallo Christopher! Da es sich bei der Temperturabweichung nicht um ein HomeKit-Characteristic handelt, lässt es sich nicht einrechnen, sorry. Viele Grüße, Volker
Reply
May 16, 2022
Luke
Is there a way of coupling Eve Thermo with Eve Room so the thermostat uses a different temp reading as reference point for adjustments? In a room where there is just one radiator setting up the offset is not a problem but I have 2 open spaces at home with more than one radiator and it is kind of difficult to synchronise them all to have a unified temperature set
Reply
Apr 7, 2022
Hello Luke! Unfortunately this won't work as Eve Room can't set the offset in Eve Thermo, sorry. This needs to be done manually, even though an Eve Room in the same room as both Eve Thermo speeds up the process as you need to find out the measured temperature in the middle of the room at a given target temperature to find our the offset. Best regards, Volker
Reply
Apr 8, 2022
Thomas
Hallo liebes Eve-Team,

ich überlege die Anschaffung der Eve-Thermostate, vor allem die Einbindung in das Home-Kit System ist für mich sehr vorteilhaft.
Jedoch benötige ich eine Funktion, die ich nirgends finden konnte. So etwas wie einen Party-Modus, also die Möglichkeit an einem Tag, weil vielleicht Besuch kommt, der es gerne etwas wärmer hat, die Temperatur für 2-3 Stunden anzupassen, ohne den ganzen Wochenplan umzuschmeissen.
Bei Mitbewerbern habe ich diese Möglichkeit entdeckt und würde ungern darauf verzichten.
Reply
Apr 6, 2022
Hallo Thomas! Sie können natürlich die Zieltemperatur per Siri, App oder Szene erhöhen. Beim nächsten geplanten Wechsel im Zeitplan wird dann wieder die dort vorgesehene Temperatur gesetzt. Viele Grüße, Volker
Reply
Apr 7, 2022
Georg
Ich habe das gleiche Problem wie Keola. Habe kalibriert, aber in Home ist immer noch die Meldung: "In der App des Herstellers kannst du „Home“ Zugriff auf dieses Gerät geben."
Reply
Mar 17, 2022
Hallo Georg! Wie ich auch in dem Thread geantwortet haben, schließen Sie bitte das Hinzufügen mit der Kalibrierung in der App Eve ab. Dann sollte die Meldung in Home nicht mehr kommen. Ansonsten erzwingen Sie nach der (erfolgreichen) Kalibrierung in Eve das Beenden aller HomeKit-fähigen Apps und starten das iPhone neu. Viele Grüße, Volker
Reply
Mar 18, 2022
Mark
Hi Eve, can you tell me the frequency that the eve thermo radiator valves check the temperature in the room to decide if they need to open the valve or not? Is this frequency controllable by the end user?
Reply
Mar 15, 2022
Add new comment